The Ultimate Strawberry Red Velvet Cheesecake Recipe for Special Occasions

The Ultimate Strawberry Red Velvet Cheesecake Recipe for Special Occasions
Introduction
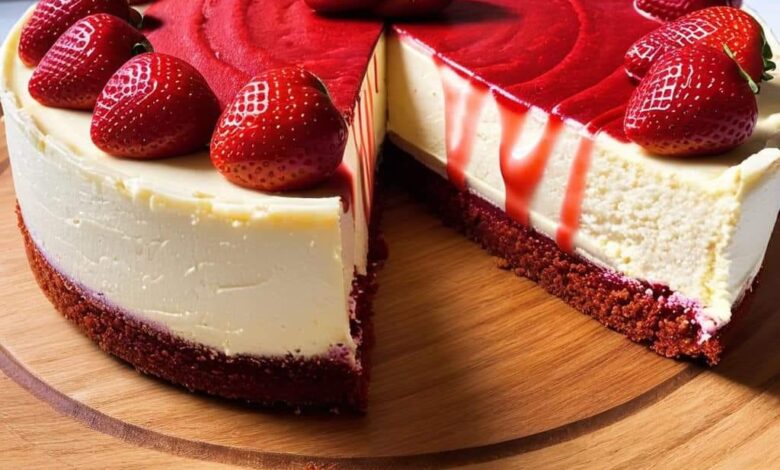
Take your dessert game to the next level with this irresistible Strawberry Red Velvet Cheesecake. Featuring a vibrant red velvet base, creamy cheesecake filling, and a fresh strawberry topping, this dessert is perfect for any celebration. Whether you’re hosting a dinner party or looking to treat your loved ones, this recipe will help you create a show-stopping centerpiece. Let’s dive into the step-by-step guide!
Ingredients
For the Red Velvet Cake Base:
- 1 1/2 cups (190g) all-purpose flour
- 1 cup (200g) granulated sugar
- 2 tablespoons cocoa powder
- 1 teaspoon baking soda
- 1/2 teaspoon salt
- 2 large eggs
- 1/2 cup (120ml) vegetable oil
- 1/2 cup (120ml) buttermilk
- 1 teaspoon vanilla extract
- 1 teaspoon white vinegar
- 2 teaspoons red food coloring
For the Cheesecake Filling:
- 3 (8oz/225g) packages of cream cheese, softened
- 1 cup (200g) granulated sugar
- 1/2 cup (120ml) sour cream
- 1/2 cup (120ml) heavy cream
- 2 large eggs
- 2 teaspoons vanilla extract
For the Strawberry Topping:
- 2 cups (300g) fresh strawberries, hulled and sliced
- 1/2 cup (100g) granulated sugar
- 1 tablespoon cornstarch dissolved in 2 tablespoons water
- Extra whole strawberries for garnish

Step-by-Step Instructions
Step 1: Bake the Red Velvet Base
- Preheat the oven to 350°F (175°C). Grease and line the bottom of a 9-inch (23cm) springform pan with parchment paper.
- In a bowl, whisk together the flour, sugar, cocoa powder, baking soda, and salt.
- In another bowl, combine the eggs, oil, buttermilk, vanilla extract, vinegar, and red food coloring.
- Gradually mix the wet ingredients into the dry ingredients until the batter is smooth.
- Pour the batter into the prepared pan and bake for 20-25 minutes, or until a toothpick inserted in the center comes out clean. Let the cake cool completely before adding the cheesecake layer.
Step 2: Prepare the Cheesecake Filling
- Reduce the oven temperature to 325°F (160°C).
- In a large mixing bowl, beat the cream cheese and sugar until smooth and creamy.
- Add the sour cream, heavy cream, eggs, and vanilla extract, mixing until just combined. Avoid over-mixing to prevent cracks.
- Pour the cheesecake batter over the cooled red velvet base in the springform pan.
- Bake for 50-60 minutes, or until the edges are set and the center is slightly jiggly. Turn off the oven and leave the cheesecake to cool inside for 1 hour, then refrigerate for at least 4 hours or overnight.
Step 3: Make the Strawberry Topping
- In a saucepan, combine the sliced strawberries and sugar. Cook over medium heat, stirring occasionally, until the strawberries release their juices.
- Stir in the cornstarch mixture and cook until the sauce thickens. Remove from heat and let it cool completely before using.
Step 4: Assemble the Cheesecake
- Once the cheesecake is fully chilled, spread the strawberry topping evenly over the surface.
- Garnish with fresh whole strawberries around the edges for a beautiful presentation.
- Carefully remove the springform pan and transfer the cheesecake to a serving plate.
Pro Tips for Success
- Use room-temperature ingredients for the cheesecake layer to ensure a smooth batter.
- Line the springform pan with parchment paper to make removing the cheesecake easier.
- Allow the cheesecake to cool gradually in the oven to prevent cracks.
- Chill the cheesecake thoroughly before serving for clean, firm slices.
Conclusion
This Strawberry Red Velvet Cheesecake is the perfect combination of flavors and textures, making it an unforgettable dessert for any occasion. With its striking colors and decadent taste, it’s sure to impress your family and friends. Follow this recipe and create a dessert masterpiece that everyone will love. Don’t forget to share your creations with us online—happy baking!


